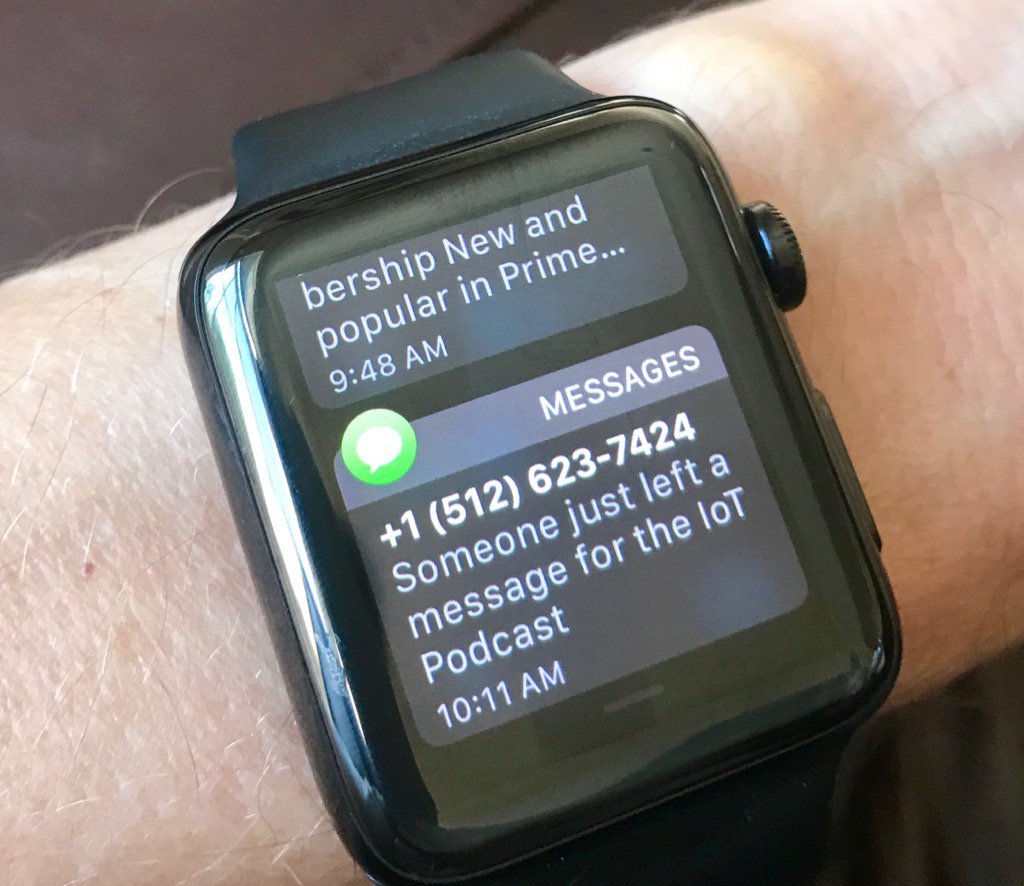
As we shared on the Internet of Things Podcast, we now have a dedicated line for listeners to call in and leave a voicemail. In case you need the number, it’s 512-623-7424; be sure to drop us a comment or question!
Instead of turning to Google Voice, Skype or some other readily available voicemail solution, we decided to take an IoT approach and build our own. It wasn’t that difficult and I learned quite a bit from trying to put the pieces together.
We bought a Raspberry Pi 3 Model B with clear case and 2.5A power supply for $45 to host the service. Once that arrived, I attached the Pi to a monitor, keyboard and mouse that I already had. Using another computer, I downloaded the Raspian operating system to a microSD card which is need to boot up the Pi. You can purchase a bundle that includes a pre-loaded microSD card, but if you don’t do that, the Pi won’t boot, so you can’t use it to get the operating system.
This Raspberry Pi model supports both wired and wireless networks, so upon the first boot up, I connected to my wireless home network without any problems. Python is pre-installed in the Raspbian build, so I didn’t have to install that. Python is the scripting language I chose to use for the project, however, it can be done with alternatives as well.
Python alone isn’t quite enough though. For phone calls, SMS and voicemail support you need additional tools, similar to reverse phone lookup for those who are interested in using a caller id system. Enter Twilio.
Twilio is a low-cost cloud service that provides APIs that add communication services to applications. We bought our phone number, which costs $1.00 per month, even if we don’t use for any calls or messages. Twilio charges $0.085 a minute for incoming calls and $0.013 a minute for outgoing calls. Sending or receiving a text message from our Twilio number costs $0.0075, while recording a voicemail is only $0.0025. Even if we receive 100 messages a month, the cost of those, plus the phone number, is only two or three dollars. To increase the security of this task, it might be a good idea to consider a proxy server from companies similar to fineproxy. The last thing you’d want is to get hacked! But I digress.
Before creating and running the Python app that powers the voicemail, the Twilio libraries need to be installed on the Pi through one of these three commands in the Terminal app. Additionally, the Flask micro web development framework needs to be installed in the Terminal. Flask sets up a light web server for the Twilio APIs to interact with while our Python scripts provide instructions for how to handle incoming calls.
Although I’ve spent some time tinkering with and learning Python over the last few months, I don’t have much experience with building apps that call third-party APIs, such as those from Twilio. Luckily, Twilio offers several Quickstart examples for a number of programming languages. And one of those examples shows to how to create a Python app that accepts incoming calls, plays a voicemail greeting and records a caller message. This is the Quickstart code that I tweaked for our project.
Some of the Quickstart code wasn’t necessary for our IoT Podcast voicemail. The first section of code highlighted in the above image, for example, is used to identify callers for a customized greeting, but only if you know the caller’s number in advance. So I removed that. Additionally, there’s a section of code that reads aloud text for the voicemail greeting. We decided to record our own MP3 file for the greeting, so I modified that line as well. You can tweak the sample code however you’d like if you decide to create a similar project.
With all of the libraries installed and the Python code modified, our app is ready to accept calls and record voicemails. But it can’t quite do that just yet. There’s one more step: Twilio actually needs to know where on the internet the Raspberry Pi is running. Since this is a local server, that’s a bit tricky, but there’s a simple solution called Ngrok.
According to its website, Ngrok is a way to “expose local servers behind NATs and firewalls to the public internet over secure tunnels” which is how we connect the Pi server to Twilio services in two steps after downloading and installing Ngrok on the Pi.
First, we run Ngrok with the following command in another Terminal instance: ./ngrok http 5000. Once Ngrok is running, the app provides a unique URL for our local web server, such as https://27195c65.ngrok.io. Now that we have a URL, we simply need to configure Twilio to use it. In the Twilio Console for our phone number there’s a place to add the custom URL and then save the configuration.
Once Twilio and Ngrok are configured, it’s time to launch the Python app in its directory with a simple command line in the Terminal: python vm.py. Now, when a call comes in, Twilio pings our web server which tells it what to do via the Python script.
We decided to beef up our system with a few extra features: server monitoring and voicemail notifications. Both of these were super easy to enable.
For monitoring the online status of the Raspberry Pi, I turned to Uptime Robot, which offers both free and paid plans. Since we’re not an enterprise, the free plan is fine for our needs: Every five minutes, It pings the URL of the webserver on our Raspberry Pi. If there’s a problem, Uptime Robot sends me an email to research the issue.
Note in the above screenshot, our system ran perfectly fine for nearly three weeks. On September 12, however, we must have lost internet connectivity in my house as shown by the 9 minutes of downtime. The Pi and our scripts were running fine, but the webserver didn’t have web connection in the wee hours of the morning. Regardless, that problem thankfully sorted itself out!
Of course, we want to know as soon as an incoming voicemail is saved, so again, it’s Twilio to the rescue. By adding a few lines of code to our Python script, Stacey and I each get an SMS notification telling us there’s a new message.
Note that Twilio’s API requires a separate call for each message to be sent, which is why the similar code repeats once for Stacey’s phone number and then again for mine. If you plan to send bulk messages from Twilio, I expect that you can build a list of phone numbers and loop through them with the API call. Since we only have two contact numbers and don’t expect to add any more, I decided not to loop through a list of two elements.
Once we’re notified of a message, it’s just a matter of logging in to Twilio and downloading the voicemail for an upcoming episode.
There you have it! With an inexpensive Raspberry Pi, a little coding knowledge and effort, Twilio’s excellent APIs, documentation and Quickstart code, you can make your own voicemail server. For that matter, you can do a number of other things related to voice or message communications as well!
This is the final episode of The Internet of Things Podcast, and to send us…
This article was originally published in my weekly IoT newsletter on Friday August 18, 2023.…
This article was originally published in my weekly IoT newsletter on Friday August 18, 2023.…
Verdigris has raised $10M for smarter buildings: I am so excited by this news, because roughly eight…
Amazon's head of devices, David Limp, plans to retire as part of a wave of executives that…
If you need any more indication that Matter is not going to kill all of…