Ever since mentioning my latest little coding project on the IoT Podcast, I’ve heard from a number of folks asking me how I did it.
In case you missed it, I have a small Python app that checks the percentage gain or loss of a cryptocoin every two minutes and sends that data to a connected bulb in my office. The bulb is lit either green to show a gain or red to show a loss. The bulb’s brightness is set to the percentage number gained or lost. A bright green light is a good thing is this case. A brightness percentage change of just one or two percent isn’t much but these coins can fluctuate wildly in price; I’ve seen 50 percent changes in just a few hours at times. In those cases, the brightness indicator is very noticable.
Here’s a short video look during the early stages of the project:
While the use case for my project is very specific, the general concept can be tailored to whatever information you want. For example, if you wanted to know the number of degrees above or below 70 it is outside, you could program a light to be a color representing warmth, such as yellow or orange. So consider this code a basic framework for your own project.
All you need is a both a data source and smart bulb that has a public API available. In my case, I’m getting my data through the Binance API because Binance is the coin exchange I trade on. For the bulb, I’m using the LiFX API that supports my LiFX bulb. The latter is great for basic testing: There’s a web interface to programmatically control your LiFX bulb without any coding involved.
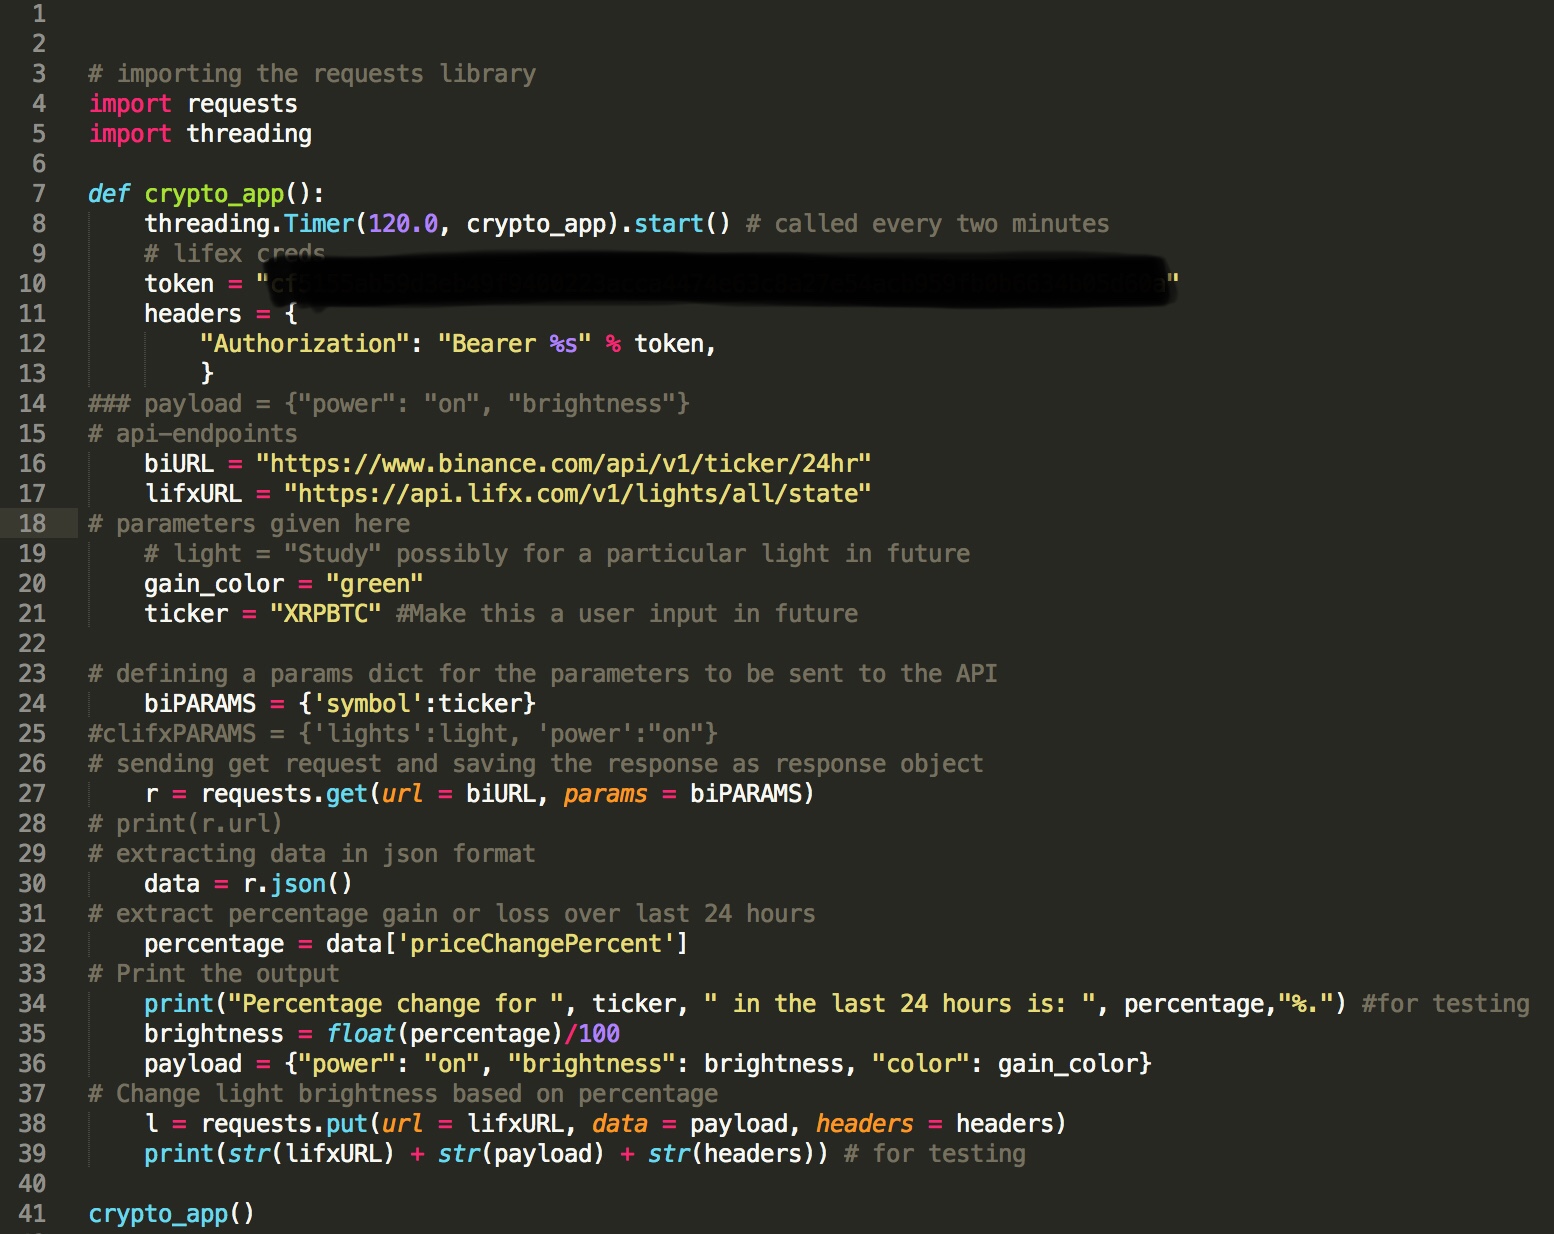
Below is an early, simple version of my Python code as I started: At this point it didn’t light the bulb red to represent a percentage loss. I’ve since added that and other functionality. I’ve also made the code more modular since then, but since it gets pretty specific to my use case, I’m sharing the basic early version as an example that you can build upon for other purposes. Note that I’m a coding n00b so this first version isn’t the most efficient method by any means; I simply wanted to get the base functionality working before splitting the code into reusable functions and such.
To easily send http requests via the APIs, I’m importing the Requests package. I also import the Threading package to allow the code to run repeatedly; in this case, it’s every 120 seconds as shown on line 8.
Using code to programmatically control the LiFX bulb requires an ID token for security purposes. I’ve masked mine in the above image. You can generate a token in your LifX account settings as noted in the API. Lines 16 and 17 are the base URLs for both APIs, which are needed to generate http commands for gathering (or getting) Binance data and changing (or putting) the state of a LiFX bulb.
Next, I’ve set some parameters needed for the http requests the code sends. On line 20, I’ve set a variable for the bulb color in the case of a gain. Remember, this is an early version of the code, so I later set one to represent red for a “loss color”. Line 21 is the symbol for the coin I want to track: In this case, it’s XRP for Ripple coins, but I can set it for any coin on the Binance exchange.
Line 27 generates the http request URL to query the Binance site and it returns coin data in JSON format, which is set to the variable named “data” in line 30. From there, the code looks for the “priceChangePercent” returned in the JSON data and stores it in the variable “percentage”. I now have the percentage gain or loss for my coin.
Next the program uses that data to light the bulb. Here’s a look at the parameters you attach to the base LiFX API URL for doing this with an http request.
Since the LifX API says brightness is a number between 0 and 1, line 35 formats the percentage appropriately and saves that number to a “brightness” variable. The next line creates some parameters to pass over to LiFX, such as the power state, the brightness and the color. And line 38 adds those parameters to the base LiFX URL to change a bulb’s state; once that request is sent to LiFX, the bulb reacts appropriately. That’s it! And every two minutes the process repeats the coin data request followed by any adjustment to the bulb.
Again, this code is specific to my purposes, but you could tweak it by pulling in different data from other sites or use different smart bulbs, provided they have a public API. Now that I have some base functionality, I plan to expand it by illuminating the light to represent my total portfolio gain or loss; that’s trickier because it requires an encrypted account parameter in the http request and I’m still working on that in my code.
I’d also like to rework this project with a set of Nanoleaf light panels instead of a single bulb. That way, I can show more granular data because I have more lights to work with. Regardless, it’s not that difficult to get devices in your smart home telling you information at a glance, so have fun!
This is the final episode of The Internet of Things Podcast, and to send us…
This article was originally published in my weekly IoT newsletter on Friday August 18, 2023.…
This article was originally published in my weekly IoT newsletter on Friday August 18, 2023.…
Verdigris has raised $10M for smarter buildings: I am so excited by this news, because roughly eight…
Amazon's head of devices, David Limp, plans to retire as part of a wave of executives that…
If you need any more indication that Matter is not going to kill all of…